




























































.png?format=1500w#)










TRX® Anchors: 6 Ways to Set Up Your Suspension Trainer™


The best TRX anchoring ideas start with where you train. Compare doorway, fixed wall or ceiling, and portable overhead setups, then choose the option that fits your room and follows the product instructions.
Key Takeaways: TRX Anchoring Ideas for Any Space
-
The six TRX anchoring ideas group the main mount options into no-drill Door and Door Hinge Anchors, low-profile Invizi-Mount placement, permanent XMount installation, portable Suspension Anchor use, and Xtender support for high or wide points.
-
Choose the anchor around the room first. Verify a stable structural point, allow enough clear workout space for your body and planned movements, and keep the working anchor within the product's supported height range.
-
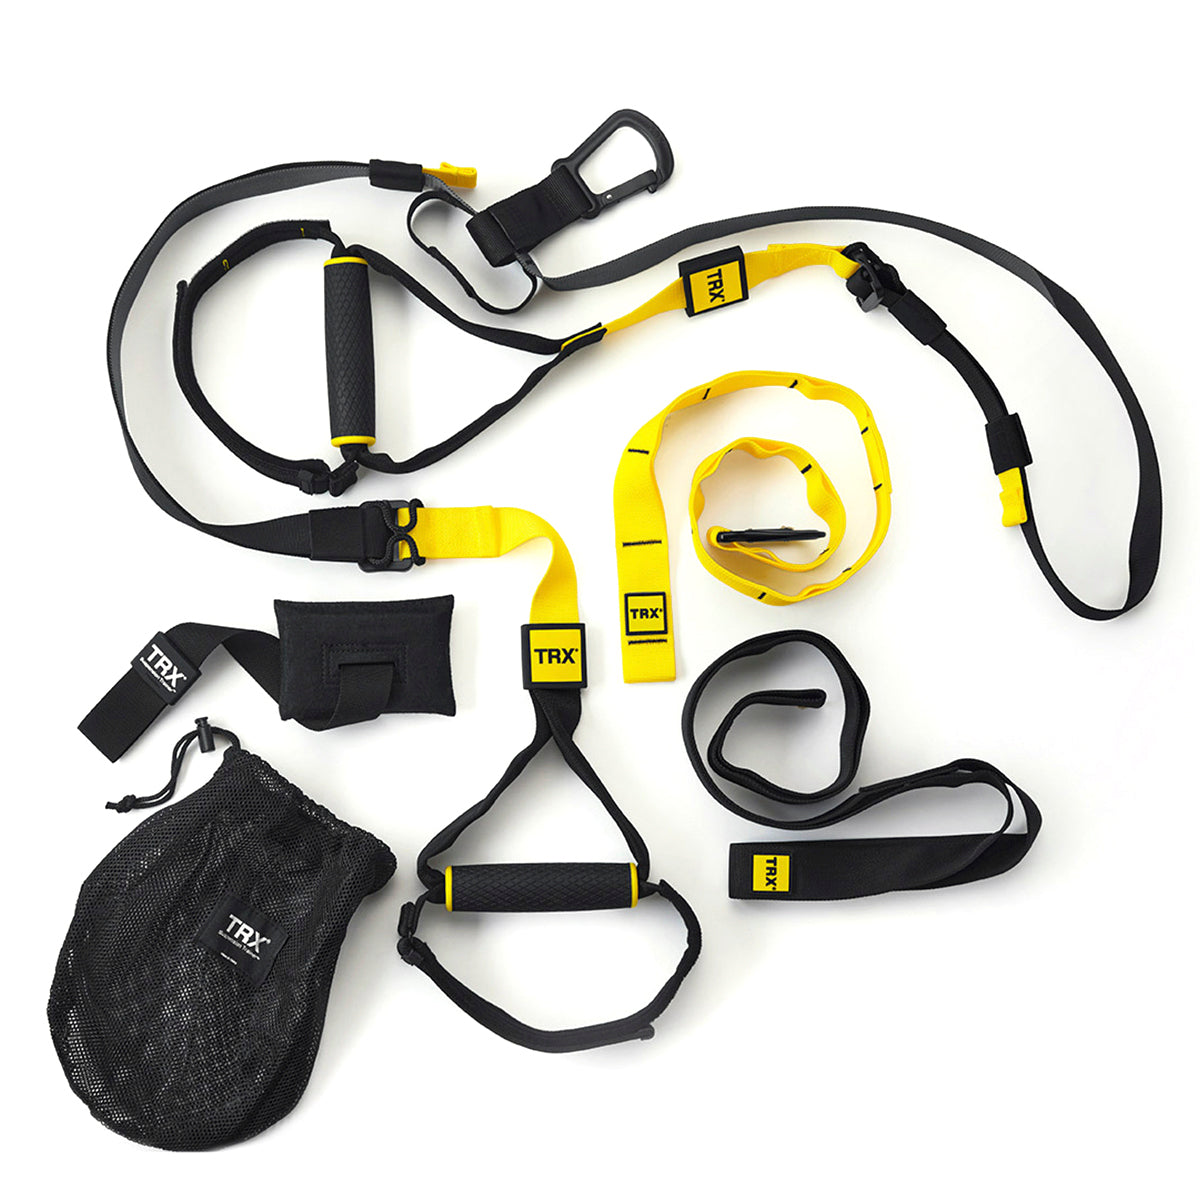
TRX pairs the Suspension Trainer™ with purpose-built anchoring systems so you can match a secure setup to a doorway, home gym, garage, or outdoor training spot instead of improvising hardware.
-
Inspect every strap, carabiner, loop, and mount before training, then complete a controlled pull test. Stop if anything shifts, makes noise, shows damage, or leaves you unsure about the structure.
Before You Anchor: Height, Space, and Safety Check
Before you clip in, check anchor height, clearance, structural strength, and equipment condition. Follow the product instructions for the working height, and use a strong, secure point that can support your bodyweight.
Leave about 6 to 8 feet of clear workout space behind the anchor point, with more room when an exercise travels sideways. Check the floor, walls, ceiling, furniture, and people around you before choosing TRX exercises for the session.
Inspect the straps, stitching, loops, carabiners, mount, and hardware before every workout. Secure every connection, then pull hard and add bodyweight gradually. Do not train if the anchor moves, the equipment shows damage, or the structure is uncertain.
When Is a Door Anchor Better Than a Fixed Mount?
A TRX Door Anchor is the better fit when you need a temporary setup, and an XMount fits a dedicated training area. Choose the door option if you rent, travel, or need to clear the room after each workout. Choose a fixed mount if you have verified structural framing and want the same anchor position every session.
The tradeoff is room control. A door anchor fixes your starting point to the doorway, and the door must open away from the workout area. An XMount lets you choose a wall or ceiling location, but it needs correct installation. Let the room and the movements you plan to train make the decision.
Which TRX Anchor Fits Your Space?
The best home TRX anchoring ideas depend on whether you can drill, which structural point is available, and where you want to train.
-
Rented space or no drilling: Use the Door Anchor on a suitable solid-core door, or the Door Hinge Anchor on a compatible interior hinge.
-
Dedicated home gym or garage: Choose the XMount when a qualified installer can secure it to verified wall or ceiling framing. It creates a repeatable anchor for an at-home full-body workout.
-
Living room with a low-profile setup: Use the Invizi-Mount on verified solid wood framing, then cover it with a picture when training is done.
-
Outdoor or portable training: Wrap the Suspension Anchor around a sturdy, smooth, stationary tree, pole, post, or beam.
-
Wall or ceiling mounting: Use the XMount for a permanent anchor, or the Invizi-Mount when you want a wall-mounted option that blends into the room.
-
High or wide anchor point: Add the Xtender when the Suspension Anchor alone cannot bring the working connection into the supported range.
Our Most Permanent Setup: The New and Improved XMount
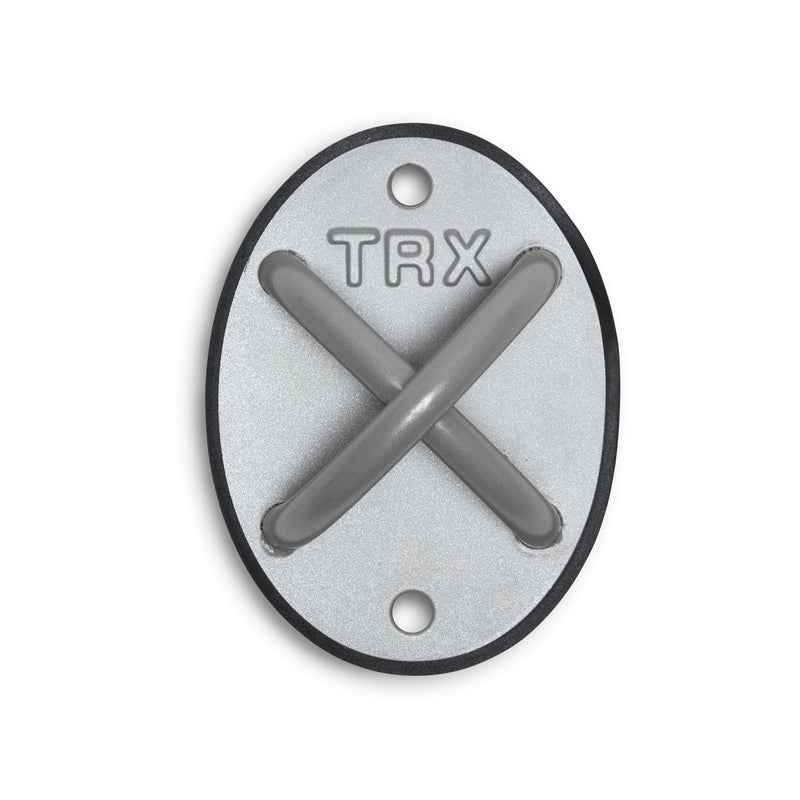
The TRX® XMount creates a fixed anchor point for a dedicated workout space. Install it on a verified load-bearing wall or ceiling stud and follow the included guide. Its X-shaped design supports multiple strap connections, including a TRX® RIP TRAINER®. The mount comes in gray, and it comes in white for lighter rooms.
Key Features
-
The trimmed backing reduces nicks and scratches.
-
Use indoors. Current TRX safety guidance says not to install the XMount outdoors.
-
The XMount can attach to an approved ceiling stud when a movement needs overhead clearance.
-
An installation guide is included.
How to Set It Up
-
Locate structural framing in a load-bearing wall, ceiling stud, or overhead beam. Use a qualified installer if you cannot verify the framing or hardware requirements.
-
Follow the included installation guide and secure the XMount flush to the framing. Thread the Suspension Anchor through the XMount before attaching the Suspension Trainer to avoid metal-on-metal contact.
-
Inspect the mount and hardware, tighten loose fittings, and pull hard on the system before training.
Skip this setup if the XMount is attached only to drywall, installed outdoors, loose, cracked, corroded, or moving under the pull test.

Which TRX Anchor Fits Your Space?
The best home TRX anchoring ideas depend on whether you can drill, which structural point is available, and where you want to train.
-
Rented space or no drilling: Use the Door Anchor on a suitable solid-core door, or the Door Hinge Anchor on a compatible interior hinge.
-
Dedicated home gym or garage: Choose the XMount when a qualified installer can secure it to verified wall or ceiling framing. It creates a repeatable anchor for an at-home full-body workout.
-
Living room with a low-profile setup: Use the Invizi-Mount on verified solid wood framing, then cover it with a picture when training is done.
-
Outdoor or portable training: Wrap the Suspension Anchor around a sturdy, smooth, stationary tree, pole, post, or beam.
-
Wall or ceiling mounting: Use the XMount for a permanent anchor, or the Invizi-Mount when you want a wall-mounted option that blends into the room.
-
High or wide anchor point: Add the Xtender when the Suspension Anchor alone cannot bring the working connection into the supported range.

Our Easiest Setup: The Door Anchor
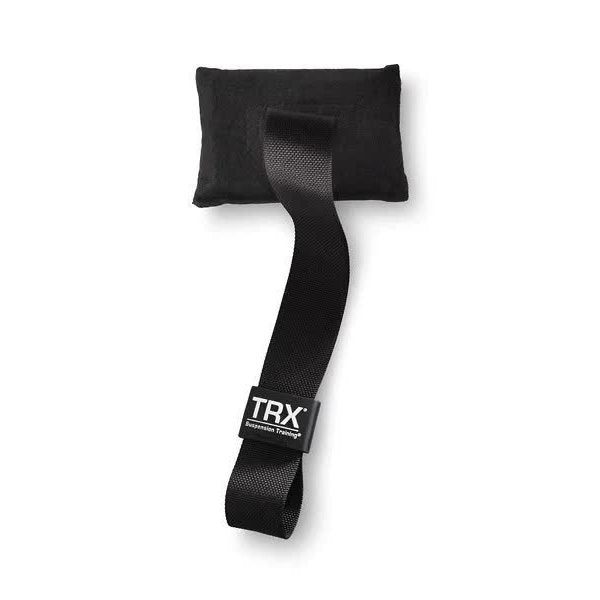
The TRX® Door Anchor turns a suitable solid-core door into a temporary anchor point. Its lightweight design packs easily for travel and clears away after each workout. Place it over the top of the door, close the door firmly, and attach your straps to the anchor loop.
Key Features
-
The Door Anchor fits over a suitable solid-core door.
-
Its padded design helps protect paint and wood.
-
The Door Anchor is quick to install and remove.
How to Set It Up
-
Choose a solid-core door that closes inward and opens away from your workout area. Lock it when possible.
-
Place the padded block over the top of the door on the far side, close the door firmly, and clip the Suspension Trainer carabiner through the anchor loop.
-
Check the closure direction, clear your workout space, and pull hard on the straps before adding bodyweight.
Skip this setup if the door is sliding, glass, folding, hollow, lightweight, damaged, windowed, rough-edged, or unable to stay firmly closed.

OUR MOST MINIMAL SETUP: THE NEW DOOR HINGE ANCHOR
Our Most Minimal Setup: The New Door Hinge Anchor
The TRX® Door Hinge Anchor creates a low-profile anchor point in the middle hinge of an interior door with a compatible 3½-inch or 4½-inch hinge pin. Remove the existing hinge pin, place the anchor in the hinge, and reinstall the pin. The no-drill setup suits apartments and multipurpose rooms where a wall mount is not practical.
Key Features
-
The Door Hinge Anchor fits most interior door hinges.
-
It provides a secure anchor point when installed correctly.
-
Its low-profile design blends into the room.
-
You can remove the Door Hinge Anchor when you need to restore the hinge.
How to Set It Up
-
Choose an interior door with a compatible hinge pin. Use the middle hinge when anchoring a TRX Rip Trainer.
-
Remove the hinge pin, place the Door Hinge Anchor into the hinge, and reinstall the pin so the anchor sits securely.
-
Attach the Suspension Trainer, confirm the hinge and door remain stable, and complete a hard pull test before training.
Skip this setup if the hinge pin is incompatible, the hinge or door is loose or damaged, the door is exterior, or the door no longer operates correctly after installation.

Our 2-for-1 Setup: The New Invizi-Mount
The TRX® Invizi-mount provides a low-profile wall anchor that doubles as picture-hanging hardware. Secure it to verified structural framing, hang a photo over it between sessions, and remove the photo when you are ready to attach your straps.
Key Features
-
The low-profile steel plate doubles as a picture-frame hanger.
-
The Invizi-Mount anchors to a load-bearing wall.
-
Mounting hardware and an installation guide are included.
How to Set It Up
-
Locate solid wood framing in a load-bearing wall. Use a qualified installer if you cannot verify the framing or hardware requirements.
-
Follow the included mounting instructions and secure the Invizi-Mount flush to the wall or beam. Do not mount it directly to drywall.
-
Thread the Suspension Trainer carabiner through the mount's webbing loop, inspect the hardware, and pull hard to confirm there is no movement.
Skip this setup if the mount moves, the hardware is loose or corroded, the silicone border is damaged, the anchoring pin is off-center, or the installation is outdoors.

Our On-the-Go Setup: The Suspension Anchor
Use this setup indoors and outdoors when you have a strong, smooth, stationary overhead point. The TRX® Suspension Anchor wraps around trees, poles, posts, and beams and uses multiple loops to adjust the working height. Wrap the anchor until the lower loop sits at the correct height, clip the carabiner into the proper loop, and attach your straps.
Key Features
-
The Suspension Anchor adjusts for anchor heights of 7 to 9 feet.
-
The Suspension Anchor is durable and suitable for indoor or outdoor use.
-
The Suspension Anchor enables a full range of motion.
-
The Suspension Anchor can be used with or without a TRX Xtender.
How to Set It Up
-
Choose a sturdy tree, pole, post, or beam that is smooth, stationary, and able to bear your bodyweight.
-
Wrap the Suspension Anchor around the point and clip its carabiner into the appropriate webbing loop. Set the working anchor 7 to 9 feet above the ground.
-
Attach the Suspension Trainer carabiner to a webbing loop, not directly to the Suspension Anchor carabiner, then pull hard to test the setup.
Skip this setup if the object is weak, loose, wobbly, moving, rough, or sharp, or if the anchor webbing is damaged, frayed, or stretched.

Our Optional Add-On: The Xtender
The TRX Xtender adds reach when an anchor point is higher or wider than the Suspension Anchor alone can handle. Loop the Xtender around a verified elevated anchor, then connect the Suspension Anchor or straps as directed. Join two Xtenders only when you need more length, and retest the final working height before training.
Key Features
-
The Xtender adds extra reach for high or wide anchor points.
-
Use the Xtender when an anchor point is above the Suspension Anchor's supported range.
-
The Xtender can wrap around wide tree trunks.
-
Two or more Xtenders can connect for added length.
How to Set It Up
-
Use the Xtender when the anchor point exceeds the Suspension Anchor's supported height or width. Loop or attach it to a structurally sound elevated anchor, then connect it to the Suspension Anchor or XMount as directed.
-
Keep every loop, carabiner, and stitch fully engaged and aligned. Do not twist, knot, or modify the Xtender.
-
Pull down hard to test the connection, then adjust the working height before you begin.
Once the anchor point is secure, use TRX guidance on shortening and lengthening your Suspension Trainer so the handles sit correctly for each exercise.
Skip this setup if the Xtender is torn, frayed, twisted, or attached to a weak, moving, rough, or sharp object.

How to Test Your TRX Anchor Before Every Workout
Test your TRX anchor before every workout by inspecting the system, confirming the setup, and loading it gradually before exercise.
-
Inspect the Suspension Trainer, anchor straps, loops, stitching, carabiners, mount, and hardware. Stop if you find fraying, cracks, corrosion, stretching, loose fittings, or other damage.
-
Confirm that every connection is fully engaged and the anchor point is stable. For a door setup, verify the door is solid, firmly closed, and opening away from you.
-
Clear the floor and workout area. Make sure the straps cannot rub against sharp edges and that your planned movement will not reach a wall, furniture, or another person.
-
Pull hard on the system, then add bodyweight gradually while staying controlled. Stop if you see movement, hear unusual noise, notice damage, or feel uncertain about the structure.
Common TRX Anchoring Mistakes
The most common TRX anchoring mistakes are mounting to drywall alone, using an unstable object, skipping clearance checks, choosing the wrong door, and adding length without rechecking height.
-
Mounting an XMount or Invizi-Mount into drywall alone instead of verified structural framing.
-
Wrapping a Suspension Anchor around a weak, loose, moving, rough, or sharp object.
-
Skipping clearance checks and discovering that a wall, ceiling, furniture, or another person blocks the movement path.
-
Using a door that opens toward the workout area, cannot stay shut, or shows damage.
-
Adding Xtender length without rechecking the final anchor height, connection alignment, and pull test.
How Should You Care for a TRX Anchor After Outdoor Training?
After outdoor training, inspect the TRX Suspension Anchor for wear, fraying, stretching, or damage, then remove it from the tree, pole, post, or beam. Clean it with a damp cloth when needed and store it indoors away from heat, light, and moisture.
Before the next session, check every loop, stitch, and carabiner, then repeat the hard pull test on a strong, smooth, stationary object. Stop using the anchor if the webbing is frayed, stretched, or damaged, and follow TRX product guidance before you train again.
View all of the anchoring options in action in the video below.
If you still need a Suspension Trainer, choose the system that matches your training style.
The HOME2 SYSTEM suits general at-home training. The PRO4 SYSTEM adds extra adjustability for frequent or professional use. The TACTICAL SYSTEM uses a more durable build for demanding outdoor and field sessions. Choose your straps, secure the right anchor, and start your next TRX workout.
New to suspension training? Check out our guide on how to get started with your TRX Suspension Trainer.
TRX Anchoring FAQ
TRX anchoring questions usually come down to whether the surface is stable, the hardware is compatible, and the setup follows current product instructions.
Can a TRX Suspension Trainer Attach to a Door?
Yes, a TRX Suspension Trainer can attach to a suitable door with the TRX Door Anchor. Use a solid-core door that closes inward and opens away from your workout area. Place the padded block on the far side, close the door firmly, lock it when possible, and complete a hard pull test before training.
Do not use a sliding, glass, folding, hollow, lightweight, damaged, or windowed door.
Can I Anchor TRX Straps to a Pull-Up Bar?
A pull-up bar can serve as a TRX anchor point only when its manufacturer permits this use and the bar is fixed, smooth, overhead, and completely stable. Wrap the Suspension Anchor around the bar, keep the webbing away from sharp edges, and stop if the bar or mounting hardware moves during the pull test.
Can I Anchor TRX Straps to a Squat Rack?
A squat rack is an option only when the rack manufacturer permits suspension training and the rack is fixed or secured against movement. Use the Suspension Anchor on a smooth, stationary crossmember. Do not use a freestanding rack that shifts, tips, or has a sharp contact point.
Can I Anchor TRX Straps to a Tree?
Yes, the TRX Suspension Anchor can wrap around a sturdy tree trunk that is stable and free of rough or sharp contact points. Wrap the anchor enough times to prevent side-to-side sliding, connect the carabiners as instructed, and inspect the webbing after outdoor use.
What If My TRX Anchor Point Is Too High?
Use a TRX Xtender when the anchor point is more than 9 feet high or too wide for the Suspension Anchor alone. Add only the length you need, align every loop and carabiner, and recheck the final TRX installation height before you load the system.
What Is the Best TRX Garage Setup?
The best TRX garage setup depends on the structure and whether you want a permanent mount. An XMount can suit a wall stud, ceiling stud, or beam when installed to current instructions. A Suspension Anchor can suit a verified smooth, stationary beam. Use a qualified installer when framing or hardware compatibility is uncertain.
Once the anchor is secure, learn what suspension training is and choose movements that fit the available clearance.
Choose Your Anchor and Start Training
Choose among these TRX anchoring ideas by matching the anchor to your space, then install it according to current instructions and test it before your first workout. TRX created the first Suspension Trainer™ as portable training gear.
Today's Door Anchor, XMount, and Suspension Anchor carry that idea into doorways, home gyms, garages, and outdoor spaces. Pick the setup that fits your room, follow its instructions, and schedule the workout you plan to do first.
What's Your Reaction?
 Like
0
 Dislike
0
 Agree
0
 Disagree
0
 Excellent
0
 Useful
0
 Great
0